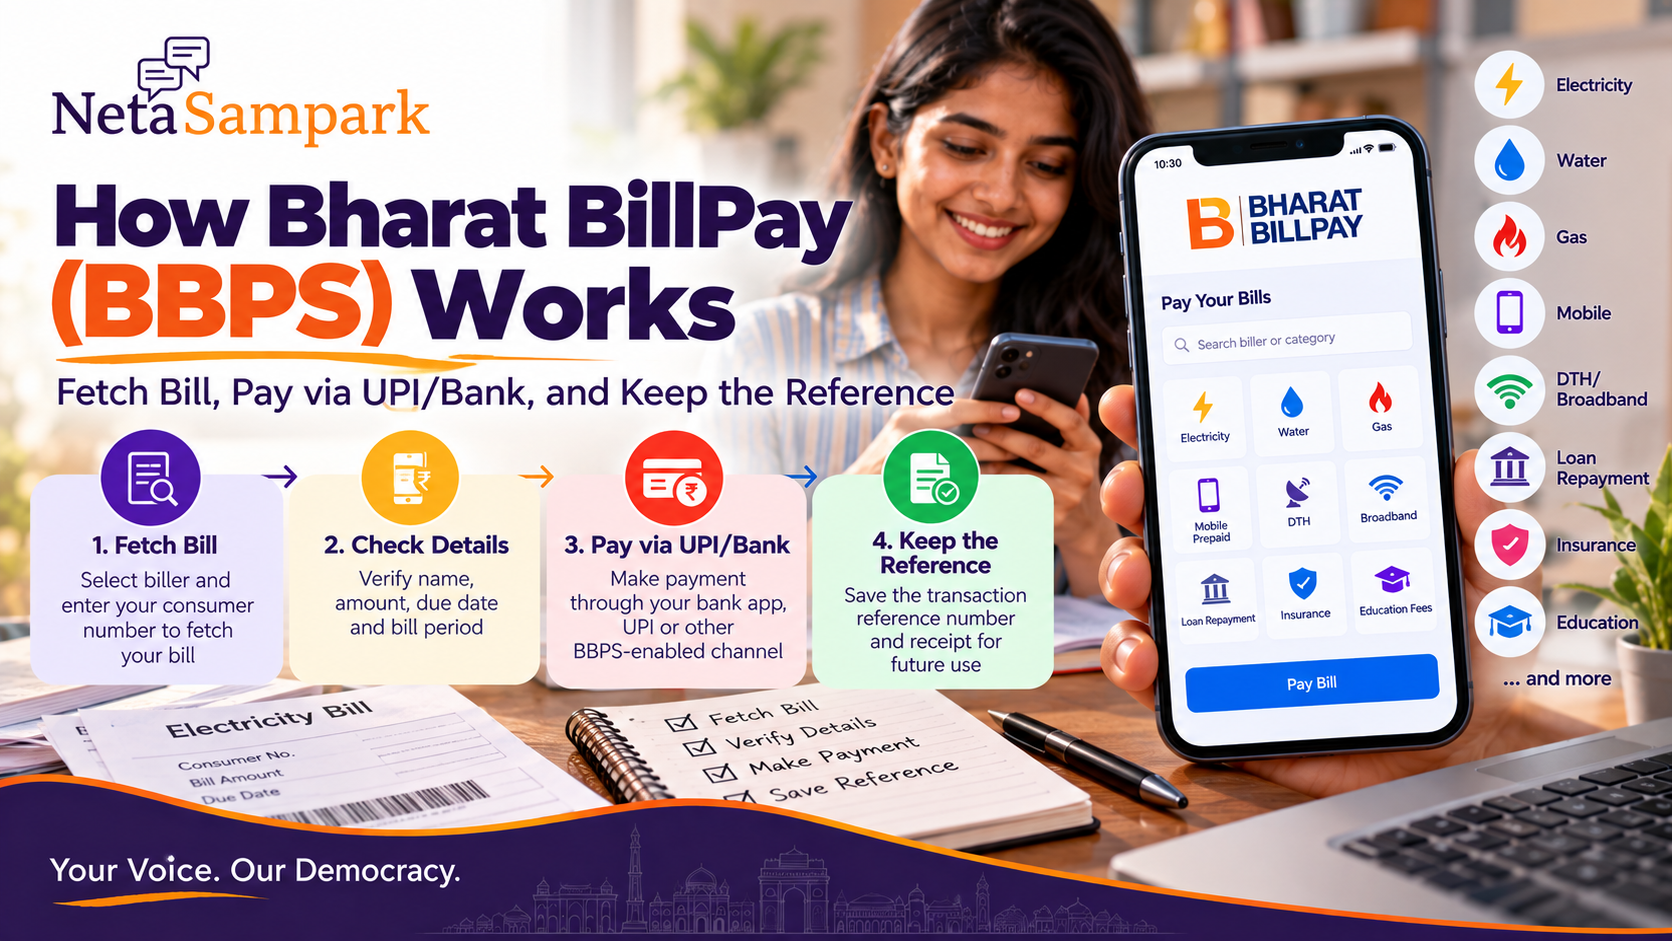
Quick take: Bharat BillPay (BBPS) is India's interoperable bill-payment system that lets you fetch and pay participating bills through supported banks, UPI apps and other BBPS-enabled channels. The important citizen habit is simple: fetch the bill → check the consumer number and amount → pay → save the transaction reference → verify if the biller doesn't update immediately. BBPS standards require the transaction receipt/reference details needed to identify and verify a payment. (NPCI)
This is a bill-fetch + payment + proof guide — not a guide to UPI account setup and not a guide to disputing a utility bill itself.
What BBPS actually does
Think of BBPS as the common rail behind many bill-payment experiences.
Depending on the biller and channel, you can encounter BBPS for categories such as:
- Electricity
- Water
- Gas
- Telecom
- DTH
- Insurance
- Loan repayments
- FASTag-related payments
- Education fees
- Municipal services
- Other participating recurring or one-time bills
You don't necessarily need to visit a separate government BBPS website.
Your bank or payment app may provide the BBPS service inside its own bill-payment section.
The basic BBPS journey
The citizen flow is usually:
Choose bill category
↓
Select biller
↓
Enter consumer/account number
↓
Fetch bill
↓
Check name + amount + due date
↓
Pay through the available payment method
↓
Save transaction/reference number
↓
Verify payment status
The most important step is the one people rush past:
Fetch the bill before paying.
If the bill details don't match, stop.
What is a biller?
A biller is the organisation collecting the bill.
For example, your electricity provider may appear as a specific biller in the BBPS directory.
Don't select a similarly named company simply because it appears first.
Check:
- Biller name
- State/region, where applicable
- Consumer-number format
- Your registered consumer details
A wrong biller + correct-looking consumer number can still create a payment headache.
Step 1 — Open your bank or UPI app
Your exact screen depends on the provider.
Look for something such as:
Bills / Bill Payments / Recharge & Bills
Then choose the category.
You may be using:
- Your bank's mobile app
- A UPI app
- Internet banking
- Another authorised BBPS-enabled channel
- An assisted payment outlet
The interface may look different, but the underlying BBPS payment flow can be the same.
Step 2 — Select the bill category
Choose the category that matches your bill.
For example:
Electricity → your electricity board
or
Gas → your gas provider
or
Insurance → your insurer
Don't assume that every biller is available through every channel.
BBPS participation and available billers can vary by service and payment channel.
Step 3 — Enter the consumer number
This is where many payment errors begin.
Copy the identifier directly from your bill where possible.
Depending on the biller, it may be called:
- Consumer number
- Customer ID
- Account number
- Policy number
- Subscriber number
- Loan account number
Don't confuse your mobile number with the biller's customer identifier unless the biller specifically says to use it.
Step 4 — Fetch the bill
After entering the identifier, select Fetch Bill or the equivalent option.
If the biller supports bill fetch, the system can retrieve information such as:
- Consumer/customer name
- Bill amount
- Due date
- Bill number
- Billing period
- Other biller-provided details
Now stop and inspect it.
Does the name match?
Does the account number match?
Does the amount make sense?
Is the due date correct?
If something looks wrong, don't pay just because the app lets you continue.
Why bill fetch is useful
Imagine your family has three electricity connections.
The numbers are similar.
You accidentally enter the wrong consumer number.
If you blindly type an amount and pay, you can create a payment against the wrong account.
Bill fetch gives you another checkpoint before money leaves your bank account.
Step 5 — Check the final amount
Don't look only at the headline bill amount.
Check the final payment screen for:
- Bill amount
- Any applicable convenience/service charge
- Total amount
- Payment method
BBPS standards provide for transaction receipts containing information including the biller, consumer ID, transaction reference ID, payment mode, bill amount, convenience fee where applicable, total amount and transaction date/time. (NPCI)
Step 6 — Pay
Choose the payment method offered by your channel.
Depending on the provider, this can include options such as:
- UPI
- Bank account/net banking
- Debit card
- Credit card
- Other supported payment methods
The exact options aren't identical everywhere.
If paying through UPI, remember:
Your UPI PIN authorises a payment.
It is not required to "receive" a refund or cashback.
NPCI specifically warns users about fake links and QR-code scams where people are tricked into entering their UPI PIN under the pretence of receiving money. (NPCI)
Step 7 — Save the reference number
This is the part many people skip.
After successful payment, save:
BBPS transaction/reference number
plus:
- Biller
- Consumer number
- Amount
- Date/time
- Payment channel
- Receipt
BBPS technical standards define a Transaction Reference ID for referring to the payment transaction. (Bharat Connect)
Take a screenshot.
Better still, download the receipt if the app provides it.
What if the bill still says "unpaid"?
Don't panic — and don't immediately pay again.
There can be a delay between the payment channel, BBPS transaction processing and the biller's own account system.
First check:
Payment status → transaction/reference number → biller status
If the first transaction is confirmed successful, avoid creating a duplicate payment simply because the biller's page has not refreshed yet.
The golden rule for failed payments
There are three very different situations.
What you seeWhat to doMoney not debited + payment failedRetry after confirming the bill detailsMoney debited + payment status pendingWait/check transaction status before paying againMoney debited + payment successful but bill unpaidKeep reference/receipt and contact the payment channel/biller
Don't treat every red Failed screen as proof that your bank account was untouched.
Check the actual bank transaction.
What is the BBPS reference useful for?
Think of it as your payment tracking number.
If you later need to ask:
“Where did my money go?”
the reference number gives the support team a concrete transaction to investigate.
Without it, you may end up explaining:
“I paid electricity bill sometime Tuesday evening.”
With it, you can provide:
“Transaction reference XXXXX, ₹2,146, paid on 24 September.”
Much easier to trace.
Don't delete the SMS
Keep the payment confirmation until the biller's account shows the payment correctly.
For important bills, save the receipt for longer.
Good candidates include:
- Insurance premiums
- Loan payments
- Property/municipal payments
- Large electricity bills
- Education fees
- Any payment where a later dispute could matter
BBPS vs UPI
These aren't the same thing.
BBPS = bill-payment infrastructure
UPI = payment method/payment network used by supported apps
So:
Electricity bill → BBPS biller → UPI payment
is perfectly possible.
The BBPS side identifies/fetches the bill and records the bill-payment transaction; UPI can be the mechanism through which you authorise the money movement.
BBPS vs your bank app
Your bank app may look like the entire service.
But the app is the customer-facing channel.
BBPS can provide the interoperable bill-payment infrastructure behind the transaction.
That's why you may be able to pay the same participating biller through different BBPS-enabled channels.
Paying at a local outlet
BBPS isn't only for smartphone users.
Participating physical outlets/agents can provide assisted bill-payment services.
For an elderly parent who doesn't use UPI, an assisted channel can be useful.
But use an authorised outlet and insist on a receipt/reference number.
Never hand over your UPI PIN.
If an agent needs to enter details on your behalf, you should still control any authentication required from your bank/payment app.
Common mistakes
Paying before fetching
You lose one of your best checks against wrong-account payments.
Selecting the wrong biller
Similar names can exist.
Entering the wrong consumer number
One digit can redirect the payment.
Assuming "success" means the biller's screen updates instantly
Systems can take time to reconcile.
Paying twice
Especially after a pending transaction.
Losing the reference
That makes later troubleshooting harder.
Giving someone your UPI PIN
Never do this.
If you paid the wrong consumer account
Act quickly.
Save:
- Transaction reference
- Payment receipt
- Consumer number entered
- Correct consumer number
- Amount
- Date/time
- Biller name
Then contact the relevant payment channel and biller using their official support route.
Don't assume a wrong-account payment can automatically be reversed.
If someone sends you a "BBPS refund" link
Treat unexpected links with caution.
A genuine refund or reversal process should not require you to disclose:
- UPI PIN
- ATM PIN
- Net-banking password
- OTP to an unknown caller
- Card CVV to a stranger
NPCI's fraud-awareness guidance specifically warns against social-engineering tactics involving fake links, QR codes and messages. (NPCI)
Family bill-payment routine
For households managing several bills, make one simple list:
BillConsumer IDBillerDue dateLast payment referenceElectricity________________________Water________________________Gas________________________Insurance________________________
Don't store unnecessary passwords or PINs in this sheet.
The objective is simply to avoid repeatedly searching old bills for consumer numbers.
Elderly-parent version
If you're paying bills for parents:
1. Photograph the latest bill.
2. Highlight the consumer number.
3. Save the official biller's name.
4. Fetch the bill before payment.
5. Read the name and amount aloud.
6. Make the payment.
7. Save the reference number.
This turns a stressful monthly task into a repeatable checklist.
If the biller isn't available
Don't assume BBPS supports every biller in every channel.
Try:
- Another authorised BBPS-enabled channel
- The biller's official website/app
- Your bank's bill-payment service
- The biller's customer-support desk
But independently verify the website/app before entering payment credentials.
The 2-minute BBPS habit
Before every payment:
FETCH
→ Confirm consumer
→ Confirm amount
→ PAY
→ Save REFERENCE
→ Check STATUS
That one sequence prevents a surprising number of payment headaches.
How NetaSampark helps
Bill payment is increasingly digital, but the citizen problem is still very practical: Which biller? Which number? Did the payment actually settle? Where is my proof?
Use NetaSampark explore guides to navigate public-service workflows, while keeping the actual payment inside your bank, UPI app or authorised BBPS channel.
Be Informed. Be Heard.
Re-check before publishing: the current BBPS/Bharat Connect biller and payment-channel availability, because participating billers and app interfaces can change. Keep the BBPS transaction reference and payment receipt until the biller reflects the payment. (Bharat Connect)